Sometimes it’s nice to share the little tips and tricks you’ve learned over the years, and some secrets you may want to keep to yourself. But if you are anything like me, you need to do all you can to stay organized and can use all the help you can get, especially if you are a film shooter! Even with all my systems in place I often find myself asking “what is this roll of film from?” or “what film is in this camera?”.
So I thought I would do a post about what I like to take along when shooting film, as well a some of Nicole’s tricks too. They are certainly not groundbreaking ideas, but maybe not something everyone has thought of, so we thought we would share! If you have any great ideas for us, we welcome them in the comments below.
I know currently no one is out walking too far taking photos, but we will all get to it again eventually, and even on your short walks alone, it’s good to have everything you need!
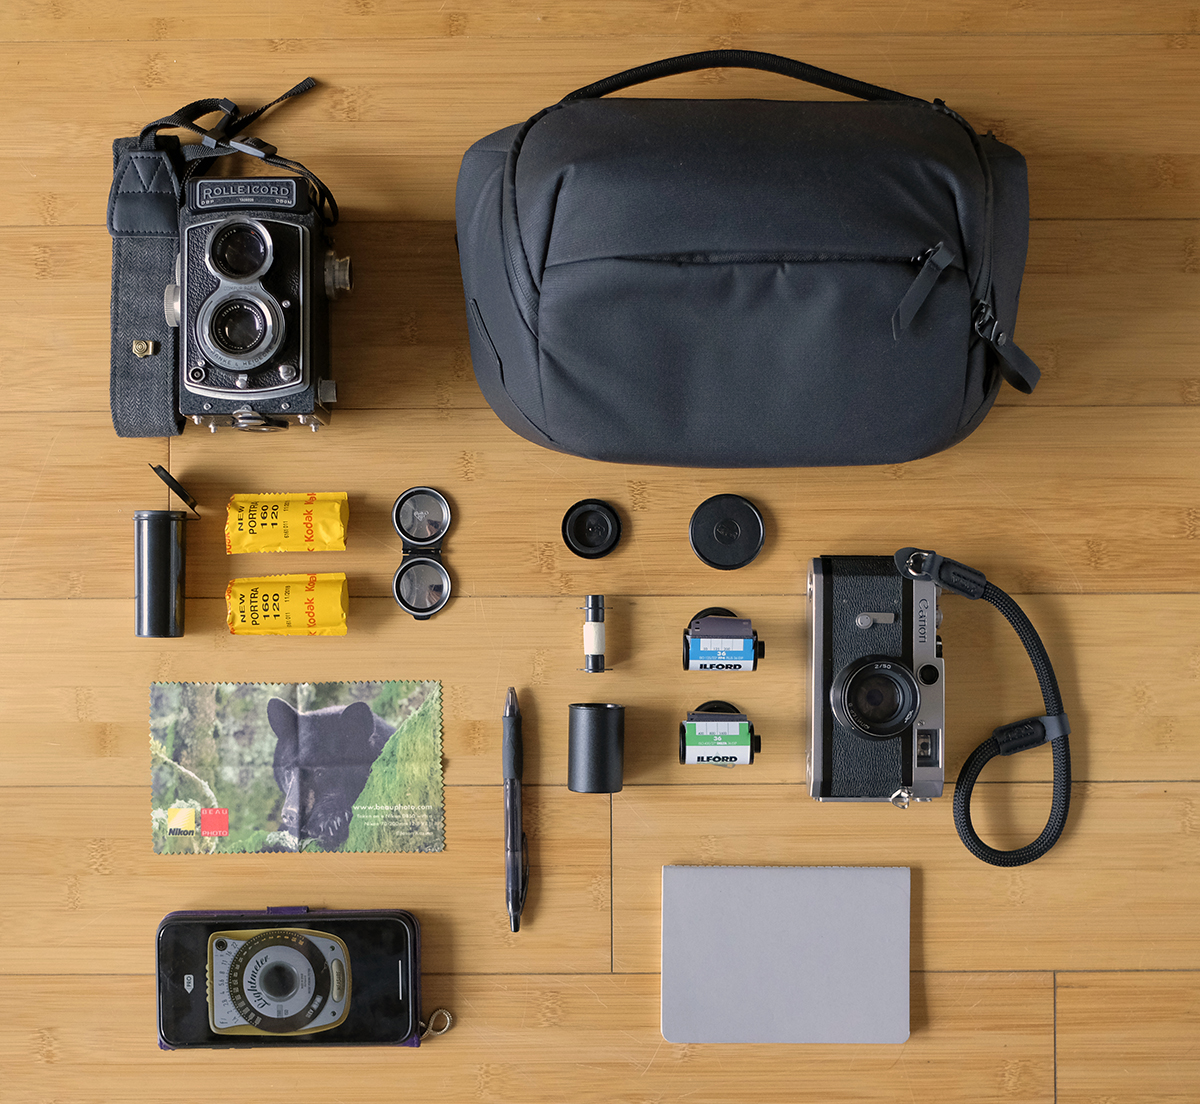
Above is a shot of my main “go to” camera bag set up for street photography and its contents, aside from personal items like wallet, keys, etc…though all those things fit in here too and need a place! Generally they will go in a zipped pocket on the outside.
First off, the camera bag itself. Now, if you’re anything like us, you probably have a closet full of camera bags. There are NEVER enough camera bags it seems and none of them are ever the perfect bag for all situations. I don’t think that bag truly exists. I have many, new and old, most of which act as storage or padding. Some of the older cameras came with cases, but 99% of the time I take them out of their old leather cases. Most are falling apart anyway and I don’t trust them. I usually keep them though, from a collectors standpoint, unless they are mouldy.
The bag that I have found to carry generally everything I need for most daily street photography type trips or bike rides though is the Peak Design 5L Sling. Now fortunately/unfortunately, they have discontinued this size of the sling. However, it was because they listened to everyone and made two new sizes! There is now a smaller 3L version and a larger 6L version. (Both of which we have in store!) The 3L is nice for one small camera and some accessories if you want to go really minimal. The 6L is very much similar to the 5L but just a bit deeper, which is perfect. I love the 5L but I also use it for my digital (Fujifilm XT-2 with 23mm) and sometimes it is a bit tight….depending what else I have in there! Mostly I love this bag for what it does hold though, and all its well thought out little pockets. I also love its sleekness and smooth exterior, with not a lot of outside pockets to catch on things or the environment. I think it also doesn’t look like a camera bag, which I like, as I don’t want to attract any more attention to myself than necessary when I have a bag full of cameras!
What fits in it? Everything you see in the photo above! I like to be organized but also have a hard time making decisions….so I almost always bring a 35mm camera and a medium format camera. Depending on the combination of those two, generally they will both fit in this bag. Lately it has been my friend’s Fuji 645 that I have been borrowing and my Canon P rangefinder, and they fit in there nicely together. My Rolleicord will also fit in there instead of the 645 too, which is my other favorite medium format camera. Occasionally I’ll have a real day of indecision and also throw in a small point and shoot that fits between the two larger cameras.
Accessory wise, I often don’t take out cameras that require other lenses, if I do, they tend to come along on their own with their extra lenses instead of a second camera. That is fairly rare for me though, or SOMETIMES I will manage to commit to just one lens on an SLR when I’m going out. So for accessories, that generally means extra rolls of film and ways to keep track of them.
I always have a tiny notebook and a pen in my bag, and in this digital era I also have an app (or two) that I try to keep track of my film on. As mentioned previously in my other post about cataloguing your cameras and film, I will use an app called Air Table. For more info about that, see my previous blog post here:
I will occasionally also use another app that is just a notebook app called aNote. It lets you create different notes and also categorize them, so I have a camera section that I list what camera I’m using and the film I just loaded into it…and if I can remember, when I take the film out. Between these 3 options I usually can remember to record what is in each camera! When you shoot old cameras that do not have a window in the back to tell you what film is in them, it can be a bit of a guessing game if you don’t shoot the whole roll in one go!
Nicole’s more tactile and often more foolproof approach is to carry masking tape and a felt marker/pen to write which film is inside, and stick it to the back of the camera. (She picked this up from her friend Troch actually, see, photographers helping photographers!) This also works well for when you then take the film out of the camera and you can stick it to the canister itself and then write what camera it was in. If you want to stay super organized you can then take that piece of masking tape after you have developed the roll of film and stick it to your Printfile storage page you store the negatives in! An ingenious way of bringing masking tape along with you, but not having to carry a huge roll of it, is to roll some on to the inner spool of an old roll of film and then put it in a plastic film canister.
If you are shooting medium format, you will also want to carry something dark to wrap your film in/put your film in after you are done shooting it. I either carry a tiny dark bag, such as one from a pack of 4×5 film, or I have also managed to hold on to a few snap top containers from Rollei, when they used to sell their 120 film in them, as pictured. If you don’t have either of those options, kitchen tinfoil also works well!
And last but definitely not least…..depending on the camera you are shooting you may also need a light meter. Of course there are many types of light meters out there, and you can get fancy with the Sekonic ones we sell. They are great but probably most helpful for studio work or professional shoots. For street photography, I like something fast, simple and again, inconspicuous. Occasionally you will find an old light meter that still works, but most don’t or are not accurate anymore. So what Nicole and I both use the most is an app on our smart phones called My Light Meter. Its icon looks like a little old school light meter even, as does the app itself when you are using it! I like it because of this, as I feel it makes it very straightforward to understand and read. Also because of this look, it lets you see what all the f-stop/shutter speed combinations are, whereas some of the “digital” looking ones do not allow you that comparison. Not to mention, most of us likely are already carrying our smart phones around with us, so having an app that will work as a light meter means one less item to carry!
Here’s what it looks like:
Beyond those fun little tips, I generally carry the usual suspects – lens cloth, extra batteries, and extra film of course!
Here’s everything as it fits in the bag (extras like keys/personal items generally fit nicely in the front outside zipper pocket). On the main section of the bag there are two stretchy pockets you can’t see that fit lens cloths nicely, and there is a spot for a tablet on the side closest to the handle, which is where I put my notebook instead. Occasionally I will also put my eReader in there, but it is bulky and I can only then carry one camera or the bag will not zip up.

What other accessories do you find necessary to take with you when you go out shooting?


