Update 11/16/2020: While there is still a bit of a glitch with the thumbnails in light-box view, otherwise the download issue for the larger images has been solved.
Update 10/28/2020: A major site update has broken the download links for the larger images. Working on it…
Update 10/23/2020: We have managed to fix the gallery glitches, plus I’ve gotten all the lenses together again for a lens lineup shot, mainly as a size comparison. Enjoy!
When we received our rental Fujinon XF 50mm f/1.0 R WR lens, I decided to do a big comparison with Fujifilm’s other “portrait primes”, in other words, prime lenses that most would consider being somewhat optimal focal lengths for portrait work. My favourite Fujinon lens for portraits is the XF 90mm f/2 R LM WR, so that was included in the test of course (spoiler: it’s still my favourite portrait lens), as was my “baby” 50mm, the XF 50mm f/2 R WR. I also added in my classic XF 35mm f/1.4 R. For completeness, our Fujifilm rep was kind enough to lend me two of his samples, an XF 56mm f/1.2 R as well as the more exotic XF 56mm f/1.2 R APD.
So there’s the six lens lineup for this test… 35mm f/1.4, 50mm f/2, the new 50mm f/1.0, 56mm f/1.2 APD, 56mm f/1.2 and 90mm f/2. The gallery with the test shots is at the bottom of this post. Note that to download a higher resolution version, click on the download icon at the bottom right corner of each larger image after clicking on a thumbnail in the gallery.
For a detailed comparison between the two 56mm lenses by the way, see my old personal blog posting here: Fujifilm’s Fifty-Sixes Compared! The APD Effect…
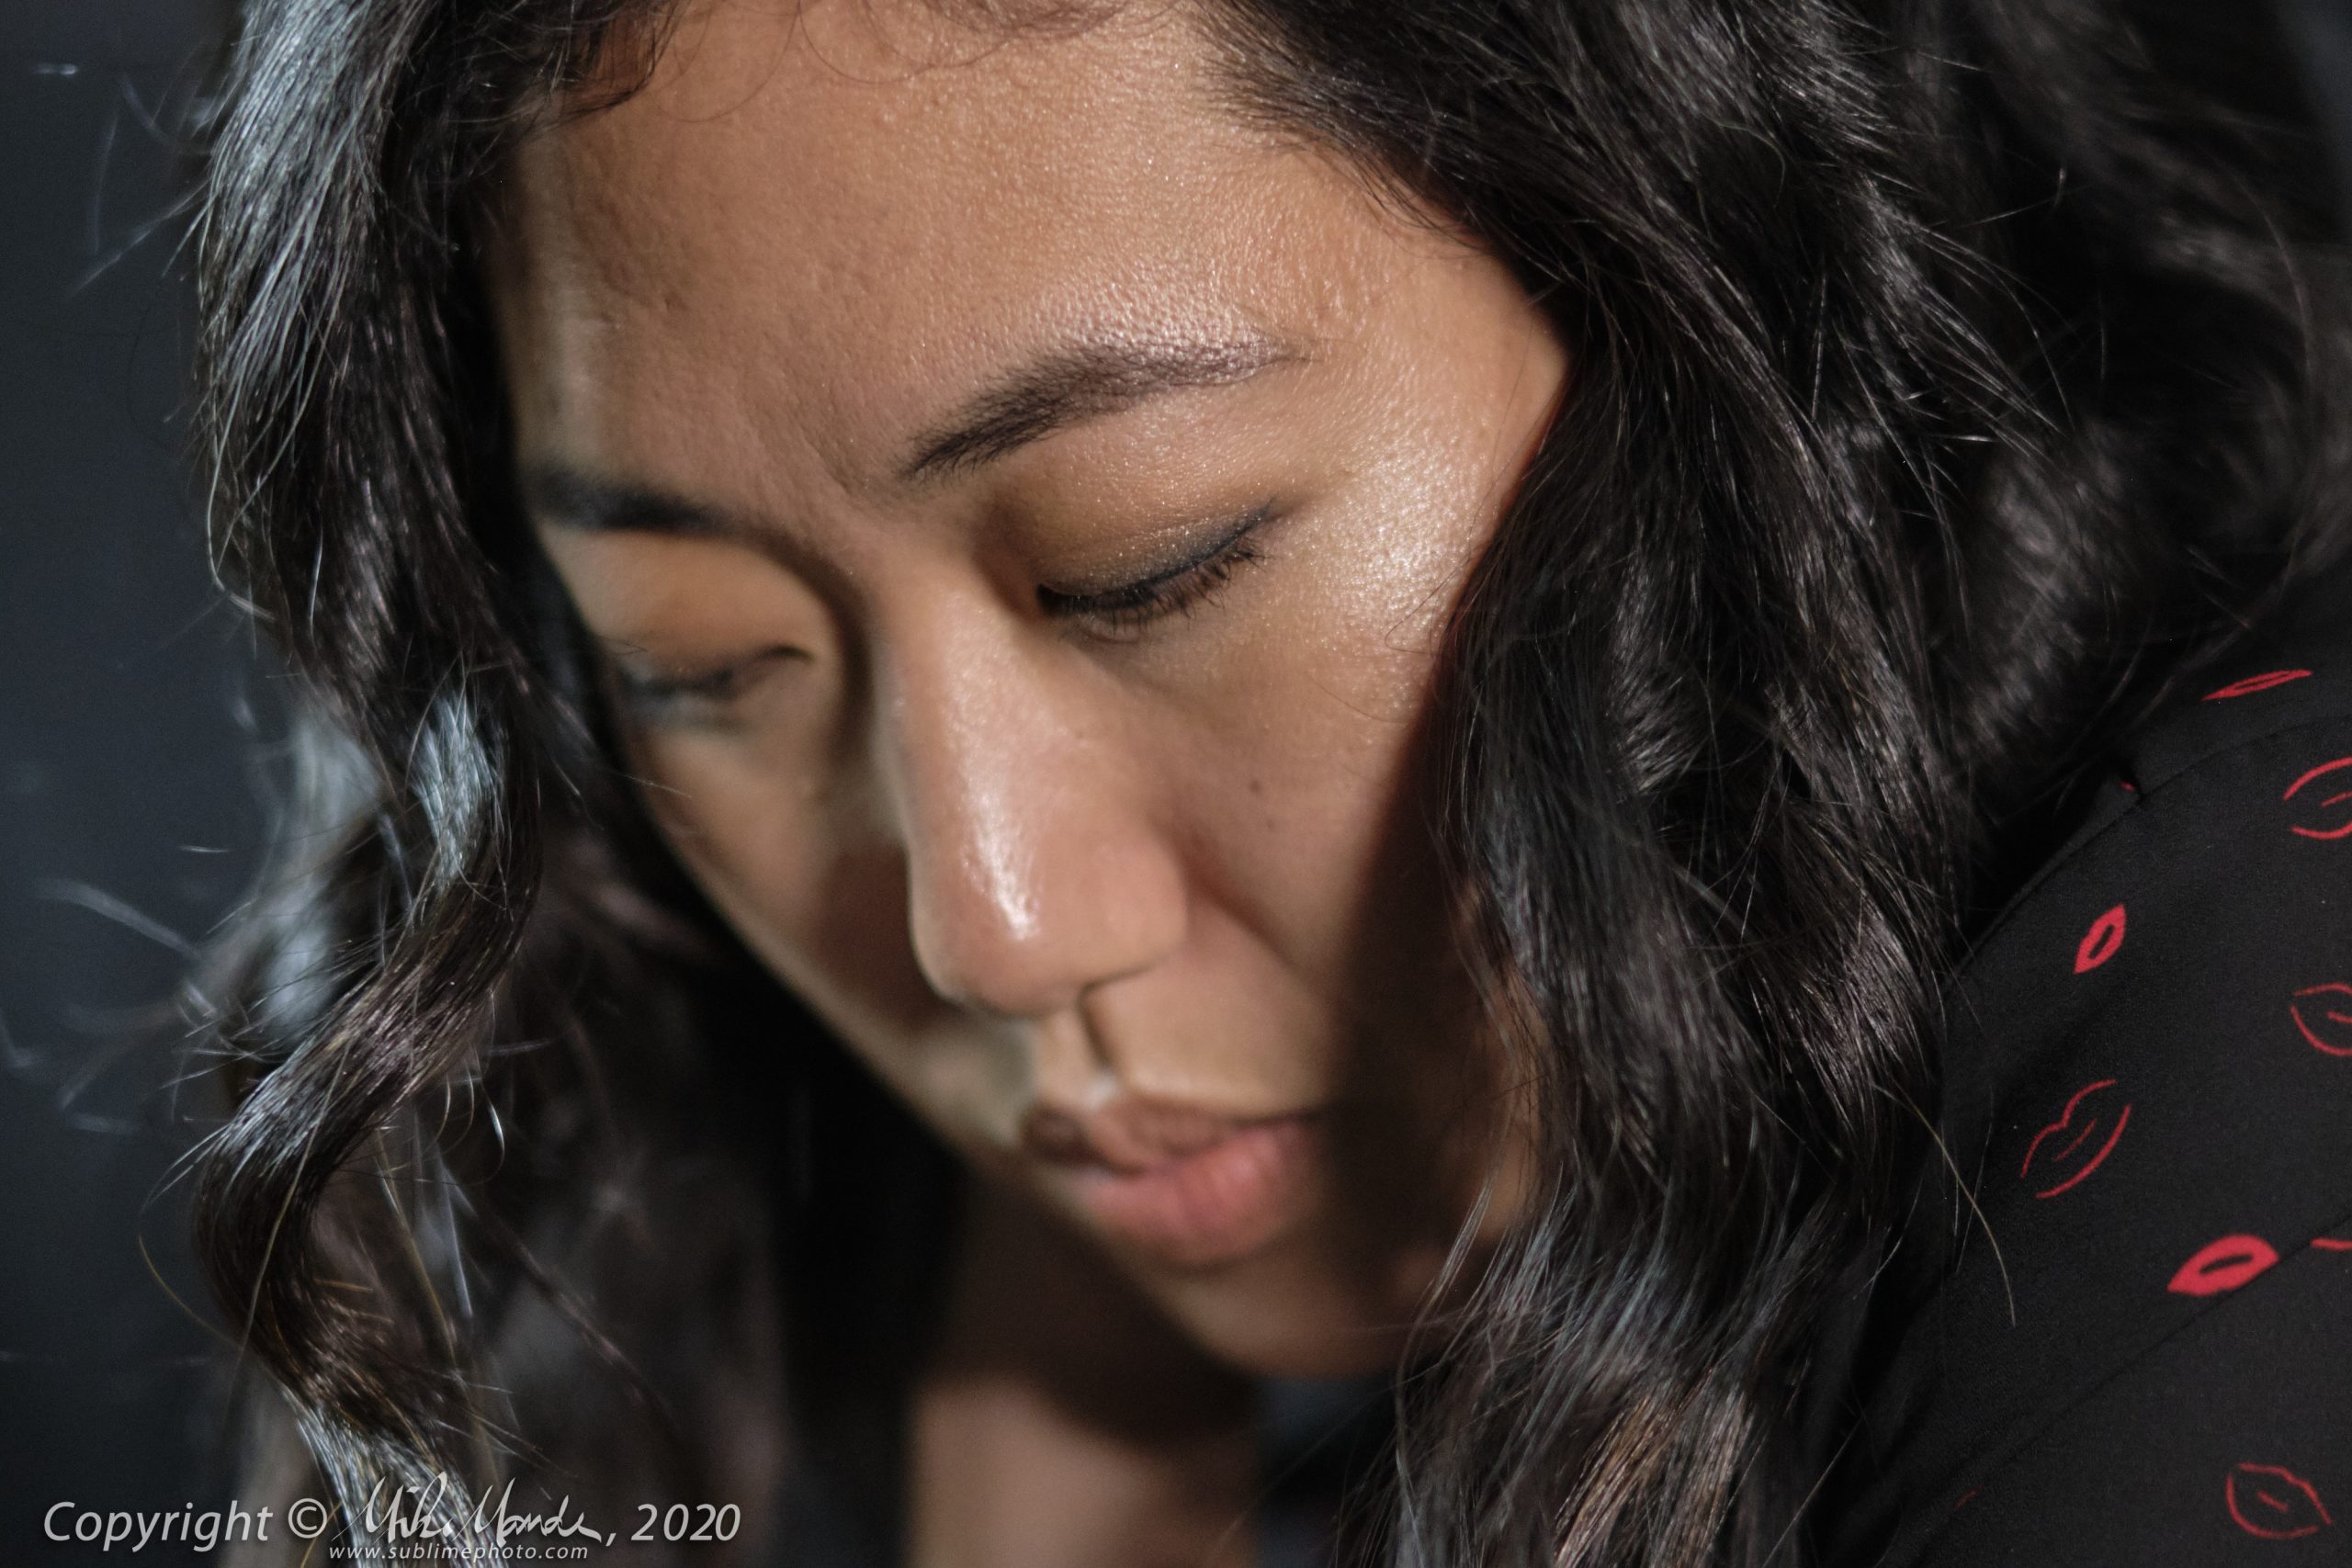
The headline image was taken with the new 50mm f/1.0, wide open at f/1.0, a horizontal crop of the original image which appears in the gallery below. The first six comparison images in the gallery are captioned with the lens used, and the filenames also mention the lens. Each lens was shot at its respective wide open aperture. The last three images are all taken with the XF 50mm f/1.0, wide open at f/1.0 as well.
You will have to pardon the quality of the lighting since I am not a portrait photographer! Hopefully the shots will at least convey how the lenses look when used in a fairly tight portrait situation. Below is the simple setup I used at home in rather cramped conditions, with a description to follow…

My lovely model Emily had to endure sitting on a bucket (padded at least!) since I wanted to get her roughly at the same level as the “bokeh ball” generating wine glasses on the table to her right. There was a high-CRI LED flashlight shining into a 2 foot octabox, seen above on the left, and to add a bit of fill, there was a Nanlite PavoTube II 6C (LED lighting tube, also high-CRI of course) lying horizontally near the right of the frame above. The wine glasses were side-lit separately by another high-CRI flashlight to generate the specular highlights. Since I used continuous lighting and not strobe, I had to shoot at ISO 800 to obtain decent shutter speeds. By the way, when I say “high-CRI”, I mean the light source has a high Colour Rendering Index, which basically means it creates essentially full-spectrum light. Most LED flashlights are not high-CRI and will often produce a ghostly bluish or ugly greenish tinge to skin-tones.
I started with the 90mm lens, then moved in closer as I worked with shorter and shorter focal lengths, in order to keep Emily the same size in the frame… or at least as close as I could gauge it visually. She did not change her position and stayed in the same spot relative to the lighting and the wine glasses, doing a great job of maintaining the same pose too I should add! The gallery images are shown in the same order, so first the 90mm f/2, then the 56mm f/1.2, the 56mm f/1.2 APD, the 50mm f/1.0, the 50mm f/2.0 and finally, the 35mm f/1.4. It is not obvious looking at the thumbnails, but the photos are captioned as well with the lens used, and of course every lens was shot wide open. The test photo shutter speeds varied from 1/180 for the f/2 lenses to 1/750 for the 50mm f/1.0, which is two stops faster wide open. The lighting may have changed ever so slightly since the flashlights I used were all being driven fairly hard and are not specifically designed for photographic purposes. They will not sustain the exact same output for long periods of time at their higher settings. The other three shots were all at f/1.0, but at different shutter speeds and ISOs.
There are three additional shots in the gallery, all taken with the XF 50mm f/1.0 wide open at f/1.0: a tighter framed shot of Emily, a shot of Jason in our rental dept. on the day the 50mm arrived, as well as a shot when I was up in Manning Park on the way to a hike. The primary purpose of the main lens comparison shots, is to see how background out-of-focus specular highlights blur with each lens, and the depth-of-field falloff in a relatively tight portrait framing.
Here is the lens test lineup, in the order I shot them in and commented on. I only have one 56mm f/1.2 in the shot since the APD version looks identical on the outside, except for the badging. If you want to look at the shot more closely, you can click on it to open in a new tab or window…
Following are some comments on each lens’ test shot, followed by some additional comments on the last three gallery photos. Note that as of the time of this writing, the 35mm f/1.4, the 56mm f/1.2 and the 90mm f/2 are all on sale. Links are provided so you can check out the pricing or even order from us online!
Fujinon XF 90mm f/2 R LM WR: this lens has wonderfully clean bokeh, out of focus specular highlights render very smoothly with minimal outlining or bokeh fringing, and they have quite an evenly illuminated core. The lens is crazy sharp wide open and being a longer focal length (135mm full-frame equivalent), I like the perspective compression it gives. As mentioned above, it is still my favourite Fujifilm lens for portraits, even though it gives a little less relative background blur than the 56mm f/1.2 or the new 50mm f/1.0 prime.
Fujinon XF 56mm f/1.2 R: the 56mm (85mm equivalent) has been the go to lens for many doing portrait work. It gives a fairly large degree of background blur, although the bokeh balls are not as clean as what you get from the 90mm. They are rendered with some outlining, as well as a slight bit of bokeh colour fringing and their cores show some unevenness as well. Wide open at f/1.2, it is also not quite as sharp as the 90mm at f/2. If you stop it down a bit, it gets a lot better, but then you also decrease the subject isolation with a slightly deeper depth-of-field.
Fujinon XF 56mm f/1.2 R APD: the APD version of the 56mm has some subtle differences compared to the regular 56mm. These differences are more obvious in the detailed 56mm blog posting I linked to above, but with these test shots some of these differences are apparent as well. Due to the internal APD filter (basically a radial ND filter), the effective f-stop of the lens wide open is f/1.7 and not f/1.2, so shutter speeds are slightly slower and there is actually slightly more depth of field than the regular 56mm, or slightly less total background blur. Bokeh balls are a bit smoother since inward facing edges of the bokeh balls are feathered compared to the regular 56mm. However the edges facing away from the center of the lens are pretty much the same as the regular 56mm. In shots where the background is further away than in this test, you would see a greater difference between the two 56mm lenses too. Here it is somewhat more subtle!
Fujinon XF 50mm f/1.0 R WR: now we come to the new 50mm f/1.0 lens (75mm equivalent). Looking closely at the bokeh balls, you can see what is arguably the nicest rendering of all the lenses. There is virtually no outlining to the out-of-focus specular highlights and the cores are very smooth indeed, with minimal structure visible. Off-centre, there is a hint of green bokeh fringing in the background, but it is not too distracting here. The depth-of-field falloff is dramatic and indeed, nailing to focus right on the proper part of the eye at f/1.0 was a bit of a challenge. I shot several frames with each lens, and out of the five I shot with the 50mm f/1.0, two were focused not quite where I wanted them to be, even with the smallest AF point size selected. That easily could have been me, moving ever so slightly after the focus was locked of course and no fault of the camera, but the upshot of such a shallow depth of field is that it’s simply difficult to perfectly nail the focus in some scenarios. For example I did a daytime group shot with the 50mm f/1.0 while I was on a hike with some friends, and even though I stopped down to f/2, they were not all sharp since they were not quite positioned exactly in the plane of focus, despite the fact that I thought I was being careful to make sure they were. At f/1.0 the shot would have been totally unusable, so I’m glad I stopped it down a little at least!
Fujinon XF 50mm f/2 R WR: the inexpensive little XF 50mm f/2 lens never ceases to surprise me. Sure, at f/2 the amount of background blur is a fair bit less than the other lenses in this test, and busy backgrounds will often remain distracting, but man is the lens ever sharp wide open. The background blur is decently pleasant too, although on close examination, you will notice some internal structure to the bokeh balls, and a bit of outlining and fringing as well. Still, not really any worse that the 56mm f/1.2 either as far as those qualities, although there is much less blur of course.
Fujinon XF 35mm f/1.4 R: this classic 35mm lens (53mm equivalent) is loved by many Fujifilm shooters. Indeed the quality of its bokeh is quite good. Not too much internal structure to the bokeh balls and not too much outlining with minimal fringing (somewhat similar looking in many ways to the 56mm f/1.2), and it is tack sharp at the plane of focus at f/1.4. It is a bit wide to be considered a tight portrait lens but it is ideal, for example, for environmental portraiture, where you might want to provide a wider context for your subject, yet still isolate them from the background in a pleasing way.
I will let you decide which of these lenses you like best, but for me it is the 90mm f/2 for this sort of tighter portrait shot. I think I would choose the 50mm f/1.0 as a close second for many types of shots, although of course the focal length is radically different and it wouldn’t be as suitable for some things. That said, the 50mm f/1.0 may be the perfect lens for environmental portraiture, offering the maximal amount of background blur, and slightly looser framing with its shorter focal length than the 90mm. At times though, for that type of shot, the 35mm would be preferred no doubt, or maybe even the XF 23mm f/1.4 R, which did not get tested here. For the money, the other lenses all have their place really, although the APD version of the 56mm f/1.2 is somewhat hard for me to recommend. For sure, if you want just a slightly softer look to your background blur, the APD might be worthwhile, but also keep in mind that the effect is only noticeable at the widest apertures. Even at f/2, the APD effect is very nearly gone. The APD is a very specialized lens, so if you want to add a distinctive look to your portraits, it may be worth considering, since it is basically the same price as the new 50mm f/1.0 and far and away a lighter and more compact option.
Getting back to the 50mm, hmm… I suppose if I were more of a portrait photographer, I believe I would definitely choose the 50mm f/1.0 over the 56mm f/1.2 (and certainly over the APD version), to augment the 90mm since for full-length body shots, head to toe, the 90mm is so long that it becomes near impossible unless you have a very big studio or are working outdoors with a lot of space. So yep, pretty sure my ideal prime lens portrait combo would be the 90mm f/2 and the 50mm f/1.0! I’m rather glad I’m not a portrait photographer actually, since my camera bag would then get a lot heavier!
Here are some comments on the last three shots in the gallery that were all taken with the 50mm, wide open at f/1.0…
I like how the lens rendered the tight portrait of Emily. I normally don’t like shots with just one eye sharp and essentially none of the rest of the face in focus, which is the case here, but I rather like how her shoulder with the fun patterned blouse is sharp, her closest eye/eyelashes are sharp, and then how her hair flows in and out of focus in different areas, lending a very soft and pleasing look to the shot overall, at least in my view. If I were being picky, on super close examination I’d say that wide open, the 50mm f/1.0 seems to not be quite as sharp (at least on my tests) as some of the other lenses are wide open, like the 90mm f/2, the 50mm f/2 or even the 35mm f/1.4, but unless you are printing huge, I don’t think you would ever notice the plane of focus sharpness being an issue at f/1.0. It is as good or better than the 56mm lenses are wide-open and stop it down even a little, and it becomes very sharp indeed. It may even be that it loses a hint of contrast wide open, so maybe it is a slight drop in contrast and not a drop in sharpness that I am seeing? In any case, a slightly softer portrait can often be an advantage since, for example, I have found the 90mm is brutally unforgiving even at f/2.0.
With the shot of Jason in rentals holding that DSLR, here at Beau Photo, the lens did a great job of isolating him from the close background. However notice the magenta fringing (bokeh fringing) that is very obvious at the edges of the reflected highlights in the chrome parts of the camera, like the flash-shoe. This sort of fringing can be fairly easy to clean up automatically (Lightroom has a fringing removal tool, with an eyedropper where you just click on the fringe colour), however from experience I know the 90mm lens behaves far better, which is another reason I like it so much. That amount of fringing was a slight disappointment to see, however it really is the only flaw I noticed in that lens and as mentioned, it’s a flaw that can often be dealt with rather easily when processing a raw file. That was the only shot I came across where it was perhaps bad enough to deal with, and I had zero issues with most of the photos. Whatever slight fringing there was in the other shots, it was subtle enough to not need any attention in post at all in my view. Below is a 100% zoom on the shot, showing the area with the worst purple fringing. On the left is the original, on the right is after using the “DeFringe” tool in Lightroom, clicking on the purple fringe itself. Click on the image below to open it in a new window for a closer look…
The last shot in the gallery was taken outside in Manning Park, and here you can really see how much depth-of-field fall-off the lens is capable of at a slightly greater distance. As a vertical, that would basically be like a full body shot of the closest person in the frame, so with a reasonably distant background, you can blur distractions away completely!
Unfortunately, I have not yet had a chance to shoot with the lens all that much, so I don’t have one of my usual galleries with many samples, however the lens can be rented from us already, so the best thing to do is simply shoot with it yourself to see if it makes for an ideal, shallow depth-of-field tool for your style of shooting. As always, up to two days of rental can be put towards the purchase if you decide the new 50mm f/1.0 is your next, ideal new fast prime lens…
I do hope this simple series of test shots proves to be useful, and maybe helps you to choose your next lens! Lastly, if anyone has any specific question about any of the lenses in this comparison, feel free to call, email, or leave a comment on this posting. And now, here are the test shots below…


