

I recently have had a number of questions regarding how to geotag images you shoot. Image geotagging refers to attaching GPS coordinates (longitude, latitude and even altitude or direction sometimes) to an image’s EXIF data, so that at a later date you can see exactly where you took those photos. It is most convenient when it happens automatically in-camera, and the majority of smartphones do this these days of course, but most higher end camera bodies to not include this feature built-in unfortunately, despite the fact that GPS chipsets are very inexpensive. You either need to buy a rare GPS add-on module of some sort (see below), pair your smartphone with the camera so the camera can get your location data from the phone, or you can synchronize your photos with a GPS tracklog after the fact. Syncing photos to a tracklog is mainly what I’ll be discussing here.

Nikon GP-1A accessory on a D750 Body
One query I recently had, was from someone trying to purchase a Nikon GP-1A, which is a GPS accessory that attaches to a Nikon DSLR’s hot-shoe and attaches to either the 10-pin connector on the pro bodies or the USB connector on others. When the camera switches on, so does the GPS module. When you take a photo, images are automatically geotagged, which is rather convenient. I had one of these back when I was shooting with a D800, and while it worked well, it made the camera bulkier and awkward to insert and remove from my camera bag. Unfortunately, the GP-1A is now discontinued with no replacement to fill its shoes either.
This tutorial will be covering tracklog synchronization using Adobe Lightroom Classic, and this method does not require adding anything to your camera, nor does it require a camera with Bluetooth. There are programs other than Lightroom out there, dedicated ones which will synchronize photos to a tracklog, but Lightroom works very well and it’s extremely convenient since I download my photos using it anyway. I do like publishing web galleries with location data, where you can click an icon to open the photo’s location in Google maps, since it can help other people viewing my images to see exactly where my travel photos were taken, not to mention that years later, even I can forget where certain landscape shots were taken if they weren’t at an iconic or easy to identify location. Even I appreciate this feature when viewing my own photo galleries!

GPS watches for tracklogging I have owned! (click image to enlarge)
Since my own cameras do not have a built-in GPS, and I don’t use any sort of smartphone Bluetooth connection for geotagging, I currently use an Apple Watch Series 6 with its built-in GPS to record my daily tracklogs, the places I’ve walked or hiked to when taking photos. Previously I used others, including various Garmin hiking or fitness watches, the original Garmin Fenix (no maps but good battery life and accurate tracklogs), then a Garmin Epix (detailed topo maps, touchscreen, accurate, but very bulky) then briefly an Apple Watch Series 3 (overall a great smartwatch but marginal battery life and at times poor GPS accuracy), and then another Garmin, a Fenix 5 Plus. After having major reliability issues with two different Fenix 5 Plus watches over a year and a half (much less than advertised battery life, unreliable heart-rate monitors, flaky or non-functioning magnetic compasses as well as numerous other software glitches… do I sound annoyed? I was!), I went back to an Apple Watch, the Series 6, in fall of 2020, and it has worked extremely well for me since. Note that I never had reliability issues with my two previous Garmin watches, but they were also much simpler, less feature packed and more geared to mainly hiking.
Many modern cameras have Bluetooth connectivity, which in theory allows them to pair to a smartphone and record location data that way, however in my experience, that isn’t very reliable. My main camera, a Fujifilm X-Pro2, has old school Bluetooth connectivity so it is a bit of a process to pair to my iPhone and while my X100V does have a more modern Bluetooth implementation that supposedly can sustain a persistent link with my phone to enable geotagging, I still find that often it does not connect quickly enough after switching the camera on, and I end up with many photos that do not have location data. That is why I use manual tracklogging. Now let me describe the steps I take to geotag my images manually. The following procedure might seem like a lot of work, but honestly it is quick and easy to do once you’ve done it a few times.
First off, for manual geotagging you need a GPS enabled watch (see above), a handheld GPS unit, or a smartphone that allows for accurate tracklog recording of your location throughout the day. Whichever device you use, you also need to be able to export the tracklog as a GPX file to your computer, so you can load that into Lightroom to sync your photos with the recorded track. A GPX file is basically a formatted text file that contains all of the recorded location points, longitude, latitude, often elevation and sometimes even additional metrics. Here is a screenshot of the first part of a GPX file as an example, opened in a simple text editor. If you are interested in a closer look, click the image to enlarge and open in a new browser window or tab, which you can do with most of the larger computer screenshots in this post actually…

What a mess, right? Not to worry, Lightroom knows what to do with all that data, so you don’t need to understand it! The tracklog data I’m using for the following workflow was recorded with my Apple Watch Series 6, using a brilliant fitness app called WorkOutDoors. It is a workout program that records not only your GPS location, but your heart rate, pace, elevation and other metrics. There is an iPhone app and a companion Apple Watch app, and they are one of the best such apps I’ve used. On the watch, the following images shows screenshots of the three data screens that I customized in the app for the “Hiking”activity. You can add more screens, more data to each or even simplify to your heart’s content. Each data field is fully customizable. I just started recording an activity while in the store here as an example, and on the Apple Watch, you can swipe between these three custom screens…

When a map is visible, you can spin the Apple Watch’s crown to zoom in or out (in the middle map view above, I zoomed out to show more area around my location, compared to the left view), drag the map around with your finger, double-tap to make the map fullscreen, tap the compass arrow at the lower right of the map to recenter your position, tap and hold to pause, save or cancel your recording etc. It all works very smoothly! With the phone app, you can download detailed map data to your Apple Watch before heading out on a hike, should you be somewhere where there is no cellphone service or cellular data. Once you actually get moving, there will be a blue line showing your tracklog recording.
After you have recorded a track and tell it to save, it automatically transfers the data to the iPhone app, which is where you can then export it as a GPX file. Here are two screenshots from the iPhone app, the left one showing the track log I’ll be using as an example in this post, and the right one showing the export options where I would choose “Share GPX File”…

The one critical thing to make this all work accurately, is to ensure that your photo’s capture time corresponds as accurately as possible to “GPS time”. The easiest way to do this, apart from carefully setting your camera’s clock to the second, it to take a photo of your watch face at the start of every day, after achieving a GPS lock to ensure the time on the watch (or handheld GPS unit or smartphone, if you are using those) is updated and accurate. Note that I have seen some cameras gain or lose a fairly large fraction of a minute each day (most are better than that though), so don’t think you can set your camera’s clock and just leave it for a three week trip and presume it will be accurate enough! The error will accumulate enough that photo locations won’t be very accurate, especially if you are driving, stop to take a few photos, then start driving again. Imagine the clock is off by a minute… well you can drive a long way in one minute!
Speaking of accuracy, note that even having a solid GPS lock under a clear view of the sky is no guarantee of absolute accuracy. Your position could easily be out 3-5 meters or more, although sometimes it is certainly more accurate than that. If you look at the photos in the example gallery, you’ll see that I seem to be in the water off the White Rock Pier for a number of shots, and I most definitely was not! Also note that under tree cover, in a deep canyon, or in a city with tall buildings, your accuracy could suffer even more due to signal blockage (trees or canyon walls) or multi-path errors (signal reflection off buildings). My original Apple Watch Series 3 for example, had a very hard time during a trip to Germany back in 2018. When recording a track in tight little towns with very narrow streets, due to multi-path errors the GPS would sometimes indicate I was hundreds of meters off of where I actually was, totally outside of the town I was in. This proved frustrating enough that I ended up wearing my bulky Garmin Epix watch for the remainder of the trip (always carry a backup!) since the GPS accuracy was far better in those conditions. With the Apple Watch Series 6 though, the accuracy is hugely improved over the Series 3 and is as good as my Garmin Watches, even better in some situations.
Once you have imported the day’s shots (see the blog posting on my Photo Download Backup Strategy), you can then use Lightroom’s ability to do a mass capture time edit, to adjust an entire day of shots so that they all have as accurate a capture time as possible, regardless of how far off your camera’s internal clock is. Following is an example of one of these shots, and in this case, I took it at the end of that day’s walkabout and not at the start, since I forgot! You can also click to enlarge as before, and on the right side you can see the original time digitized was 14:38:59, but the adjusted time (already done in the screenshot) to match the watch face is 14:39:32.

The way you adjust the time is by displaying the group of photos you are adjusting in grid view (see screenshot below), then selecting all, and ensuring the watch face photo has the main highlight, which is the time reference image. Note that even if you have all the images selected, you do need to be in grid view for this to work (below), not the single photo view (above) which shows the watch face. You then choose the “Edit Capture Time…” option from Lightroom’s “Metadata” menu….

You will then get the following window, where you should select the “Type of Adjustment” as indicated, and then input the photo’s corrected time, the time indicated on the watch face. Once you click “Change All”, in a matter of a few seconds all the photos you have highlighted in Lightroom will have their capture times offset by the same amount, in this example adjusting it to be 33 seconds ahead of the camera’s clock…
 Note that the watch face photo can be taken at any time really, and possibly the most accurate would be in the middle of the day, since Lightroom will adjust both the photos taken before the watch face shot, and those after as well. As mentioned previously, I do take a watch face photo ever day to ensure that photos are not out by maybe more than a couple of seconds from the reference image as the day progresses. Once the photos have their capture times tweaked, you are now ready to switch to Lightroom Classic’s Map view (leaving all the relevant photos highlighted), import the GPX tracklog file and then sync the photos. Here is the Map view with a red arrow pointing to the little squiggle “tracklog” icon. You click on that, and a popup menu appears, where you will want to choose “Load Tracklog”…

Note that since I organize my Lightroom library and have a separate folder of images for each day of shooting, I create a folder named “GPS” inside each one and this is where I save all the tracklogs for the day. It doesn’t actually matter at all where you save the tracklogs, but for me, this keeps things neat and tidy. Once you choose the tracklog in the resulting dialog box and it’s imported, Lightroom updates the map view as follows, and do note that you need a live Internet connection for Lightroom to display the maps…

On the above screenshot, you can now see the blue line showing in Lightroom, which is my recorded tracklog for that day. I have circled an erroneous part of that track in red. I had stepped into a public washroom for a moment, which totally killed the GPS accuracy, so in this case you can see a straight line jutting out to the left at roughly a 45 degree angle from the base of the pier, definitely not part of my actual walk! When I came out of the washroom and walked out onto the pier, it probably took 30 seconds or so for the accuracy to re-establish itself and for the track recording to once again be accurate. Note that unless you are on the upper floor of a wooden house, or right beside a large window, GPS signals tend to not penetrate indoors at all.
Now that the track is imported, the next step is to process all the highlighted photos. If you have somehow deselected all the day’s photos, you will now want to reselect them again. In the following screenshot, once again click on the tracklog icon as indicated with the red arrow and now choose “Auto-Tag xxx Selected Photos” where the xxx indicates the number of shots you have selected.

Watch the screen carefully since after the auto-tag is complete, a brief message will indicate how many shots were successfully tagged. Note that it only takes seconds to tag hundreds of photos, even quicker if your computer is very fast. Once the tagging is complete, as you will see the following screenshot, there should now be flags along your tracklog, indicating where the photos were taken and how many in each spot. Success!

You can zoom in or out, click on the flags to highlight the corresponding photos, click a photo thumbnail below the map to move the map and centre it on the selected photo location and more. Below, I’ve clicked on the flag (14 photos) at the end of the pier, and the 14 corresponding photos are highlighted on the thumbnail strip below. The orange flags turn yellow when the corresponding photos are selected. A little photo preview window also shows on the map…
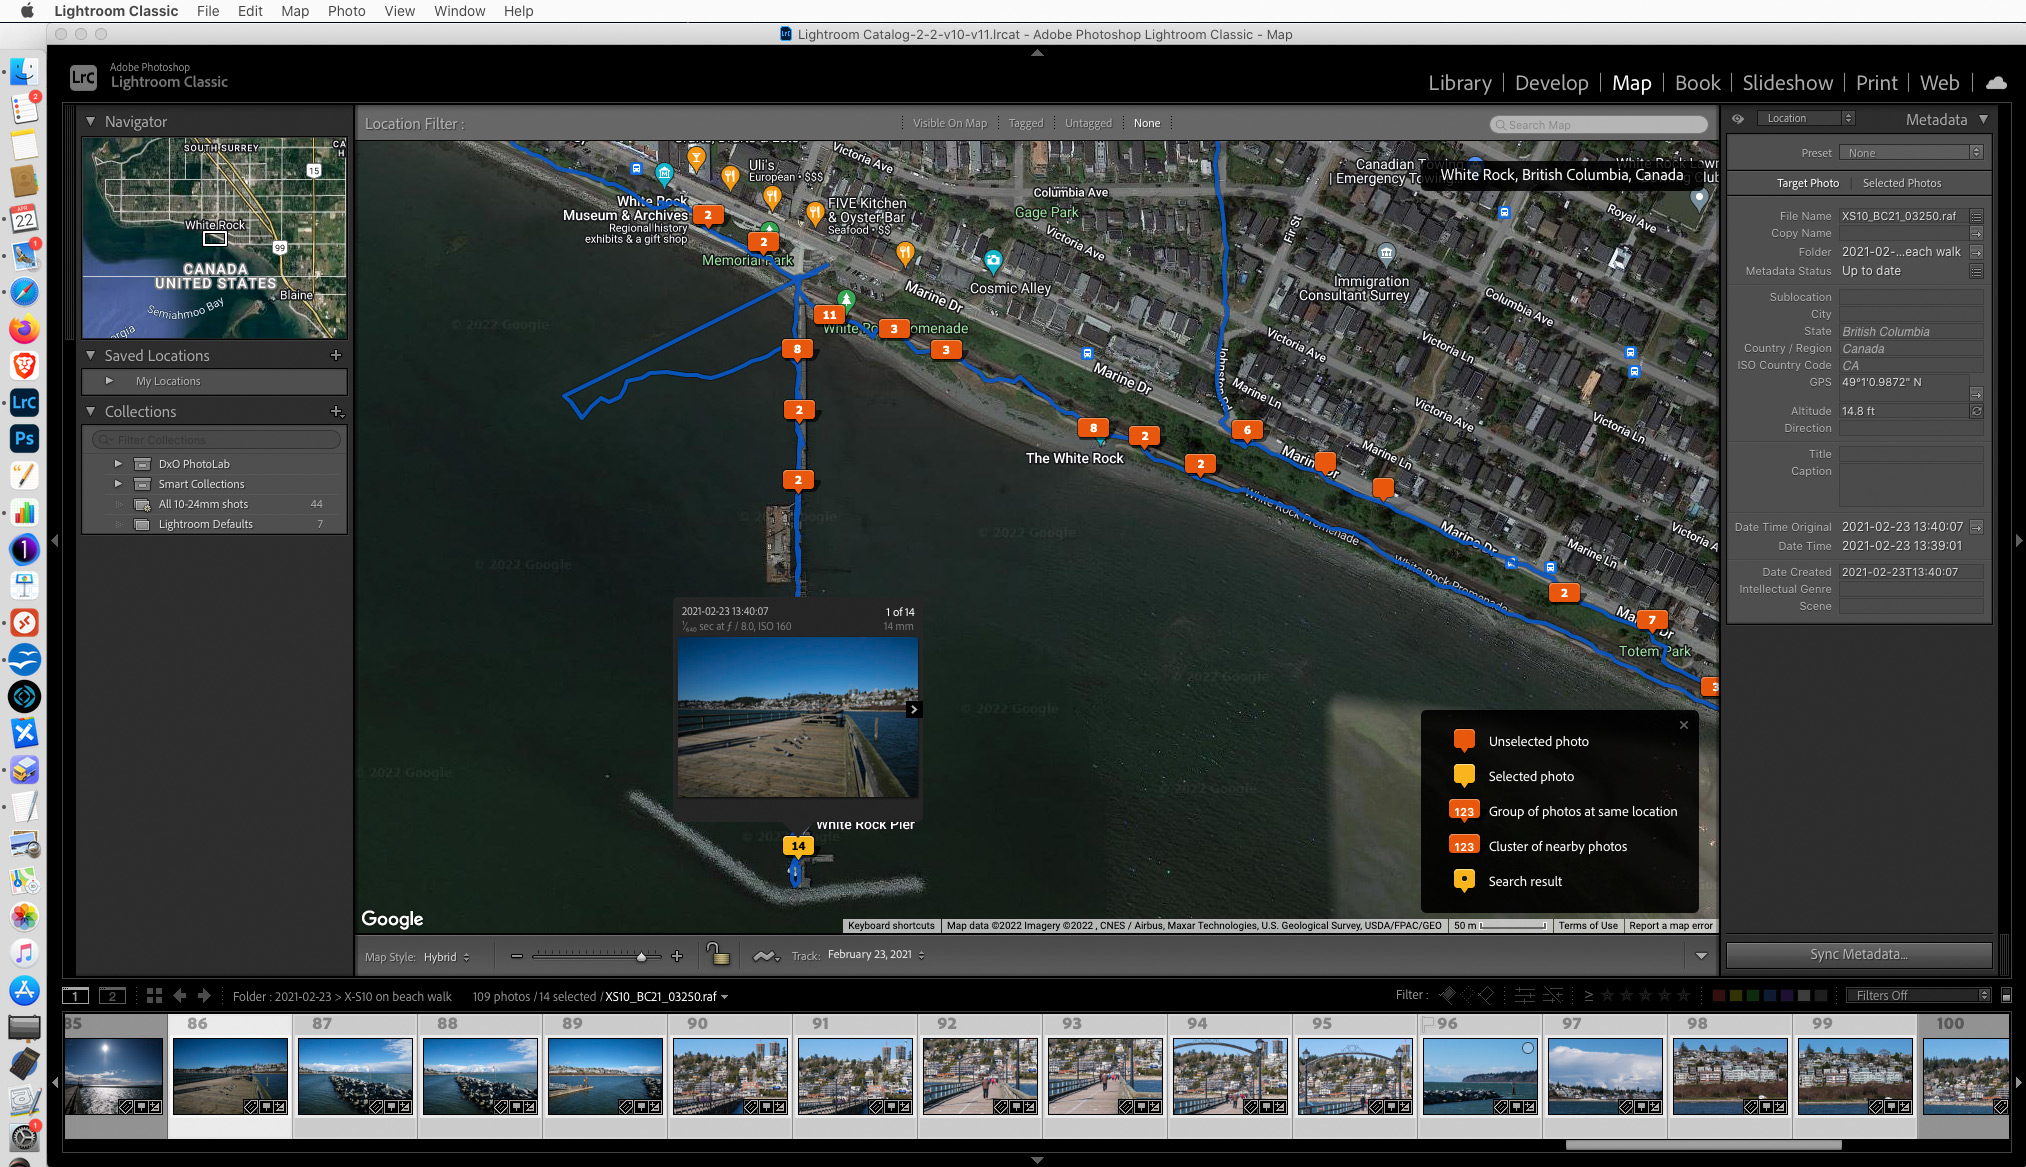
Note that as you zoom in and out, differing numbers of flags showing the number of shots in each location will update, so at max zoom the best separation will be visible. Here is a zoomed in shot at the end of the pier, showing more detail, the 14 shots indicated in the above screenshot now separated into smaller groups. Here you can see some normal GPS inaccuracies, showing the track wavering off the pier I was standing on…

If you have one or more photos that are clearly far off where they should be, you can select those shots, and either the drag&drop from the thumbnail strip onto the map window, or drag the flag in the map window to where it should go. Note that sometimes moving images can be a bit tricky since they want to “stick” to the tracklog unless they are moved some distance away, but it seems to me that more recent versions of Lightroom must have improved this behaviour since I could not reproduce it today.
Lastly, have a look at the screenshot below, where the red arrows are pointing…

The small downward arrow is pointing at the “geotag icon” on the thumbnail, so you can see which shots have GPS coordinates. In addition, the larger arrow to the right is pointing at the actual GPS longitude (≈123º West) and latitude (≈49º North) and altitude (≈15 feet) of the selected image number 87. Note the small square button with a right-facing arrow to the right of the coordinates? Clicking that will centre the map view on those coordinates. If you want to for any reason, you can also manually edit the GPS coordinates.
On the map screen there are additional functions to allow you to filter the images by whether or not they have GPS data, as well a function to strip location data from the images, should you accidentally make a mistake, for example, forgetting to first adjust the capture time, or should you want certain images to simply not contain location data at all.
So that basically covers how to geotag your images. Once you do this a few times, it will be easy! Below is a link to the “White Rock Wander” gallery which includes the images from the above walkabout. The geotagged images start at number 66 in the gallery and go to the end. Thumbnails for images with GPS data have a little “globe” icon at the upper left. When you click that, a new browser window or tab will open with Google Maps, and a red pin will show the location where I took that photo…
For a slightly more interesting gallery of geotagged images, have a look at the following one from my 2019 road-trip to the US Southwest, some shots at Kodachrome Basin State Park, a view down on the Escalante River canyon, shots along the incredibly scenic Burr Trail and more…
2019 Grand Canyon Trip – Burr Trail
Note that the above galleries were exported directly from Adobe Lightroom using a web-gallery plugin that I highly customized a number of years ago. None of the default web gallery modules in Lightroom offer the ability to show/link geotag metadata at the moment, although there are many you can purchase that would. While the specific web-gallery plugin I customized is no longer available to buy, there is a newer version from the same developer, and I am quite certain it will still offer similar abilities to link geotag metadata. Have a look here: The Turning Gate
In addition, if you export images from Lightroom and leave location metadata intact, and if you upload to various web-sites that offer online galleries, some of those will allow you to see where the photos were taken too. That said, remember to strip location metadata from shots where you might not want people to know where they were taken, for example at your home, at someone else’s home, at any secret shooting locations you don’t want anyone else to know about, especially if its environmentally sensitive, so it doesn’t get overrun and trampled by all those Instagram wanna-be photographers that live to just go out and mimic other people’s photos, sometimes “loving to death” that which they aspire to photograph…
I hope this tutorial has been helpful to those looking at geotagging their photos! If you have any questions, feel free to email me.

2 replies on “Geotagging Images in Adobe Lightroom”
Mike Nelson Pedde
Mike:
Thank you for sharing this post. I have three additions:
1) Remember that GPS information is essentially line of sight, so if you’re walking in heavy forest cover (or in a cave system, or underwater) your GPS might not work as well or not at all. This is highly variable and dependent on the receiver you’re using. A phone may have a GPS receiver, but it’s not a handheld GPS device.
2) For people who don’t use Lr (ACK!! yes, such people exist – I prefer Capture One) there are other options. I use a (donationware) program for Windows called Geosetter (https://geosetter.de/en/main-en/) that tags my A7RIII files with geolocation information captured with my Android phone (and exported in .gpx format). I can then go to the Metadata section in Capture One and click the link and it will open the location in Google Maps in my web browser.
3) Before sharing an image with geolocation information, consider who the potential audience might be. For example, if you post an image of your kids or your garden, made in your back yard, do you really want people to know EXACTLY where you live? How about a (secret) area of natural beauty… do you really want 50K people to show up to take selfies because the wildflowers are overly exuberant this year? Finally, it’s been proven that in Africa (for example), people posting images of animals seen on safari have proven unwitting collaborators with poachers who have used that information to zero in on the location of elephants, rhinos and other species.
In Lr one can designate certain areas as private (location information won’t be shared) and/or you can turn off the location metadata when exporting from Lr, C1 or whatever. But if you have location on your phone turned on and are uploading images directly then you may be broadcasting information of which you are unaware.
Mike.
Mike Mander
Hi Mike,
Thanks for the comments, especially the tips on geotagging with a different program, of which there are many, so it’s good to get a recommendation from someone who’s actually used one in their workflow and is happy with it.
I also use Capture One Pro to actually process my shots these days. I do use Lightroom for initial importing/renaming, backing up and geotagging my images, but once that’s done, I switch to Capture One to process them. I then switch back to Lightroom to export my web galleries using that plugin I modified.
I was not aware that one could designate private geolocation areas in Lightroom? I will have to investigate that…
EDIT: I did have a quick look and see that in the “My Locations” tool in the Map tab in Lightroom, you can designate private areas with an adjustable radius. I will update the article in the future, so thank you Mike for nudging me to look for that option!
Comments are closed.