

Who made up that title!? Trust hard drives? Ha! NEVER! Never, ever trust a single hard-drive to keep your data, your images or your documents secure. In fact, don’t even trust an SSD (solid-state-drive) since they too can fail. I’ve had it happen myself. Recently, an 8-month old SanDisk Extreme Pro external SSD drive failed here at work. In the past year or so, at home I’ve had three hard drive failures, although I hadn’t had any for years prior. Did I lose any data? Nope… because I do not trust hard drives, or SSDs! Every hard drive or SSD I own or use is either in a mirrored RAID setup, or the drive is backed up nightly to a second drive using SuperDuper (https://www.shirt-pocket.com/SuperDuper/), an excellent Mac OS X backup solution. Another very good OS X backup solution which we use at Beau Photo is Carbon Copy Cloner, available here: https://bombich.com.
Both of the above programs will exactly mirror my drives and only copy over the added or changed files, which I have set up to occur nightly on an automated schedule. In addition, when you backup your startup disk, it will be a bootable copy, so should your startup drive fail, you can just boot off your backup drive to keep working until you’ve got a replacement for the dead drive. The backup drives are all exact copies, so there are no cryptic backup files that can only be viewed by restoring with the backup software. Note that neither of those two programs will do versioning, like Apple’s Time Machine backup, so if you accidentally delete a file from a working drive for example, after the software runs that night, the backup drive’s copy of that deleted file will also be gone.
For Windows computers, I have been struggling to find backup software that is as good as either of the two I mention. Most programs I’ve come across that seem well regarded, are ones that hide your backup data in a database type of structure and require that you use the software to access or restore the files. One program we are using at Beau Photo is Acronis True Image (https://www.acronis.com/en-eu/products/true-image/). Oddly, they now also seem to include an anti-virus / cybersecurity component to the software. Ugh… I wish they would keep a simple option that only does backups. The other backup solution is simply to use Window’s own backup feature, which seems to work just fine on modern versions of Windows. I’ve had a number of bad experiences with older versions of Windows backup in, for example, the Windows XP days, where folders would be backed up but not the files inside – yikes! In any case, if you are a Window’s user, it might be a good idea to do some more research yourself to ensure you have a good backup solution. Many of the drive cloning and backup programs I’ve found for Windows, in trying to find an equivalent to Carbon Copy Cloner for example, only seem downloadable or purchasable from rather sketchy seeming websites.
Before going any further, you might want to read a detailed overview of my mobile photo backup strategy and if so, please refer back to a blog posting of mine from 2020. It describes how I download and backup memory cards after a shoot or while traveling: https://www.beauphoto.com/photo-download-backup-strategy/
In this article, I am going to expand on that, explain and discuss using RAID setups, dual drive failure redundancy as well as my backup strategy in using a Blu-ray M-DISC burner. First, I am going to mention a recent near catastrophic situation where I had a 4TB drive fail at home and then also had the backup drive start glitching while I was restoring the photos to a new, replacement drive!
A Near Loss of a Drive and its Backup
I had been working with 100 megapixel files from a borrowed Fujifilm GFX 100S and noted how sluggish things were in Lightroom. Now, I had previously worked with 100MP files and they were not that slow, but at the time I had forgotten that and attributed the sluggishness to the large files and maybe to a Lightroom update… however that was not the case.
 My LG Blu-Ray burner, two of my 2-bay RAID boxes (OWC and NewerTech) plus hard drives under my desk.
A few days later, when I went back and started working with the 24 MP files from my own Fujifilm X-Pro2 again, Lightroom was still very sluggish, constantly giving me a spinning beachball curser. That is when I started to suspect I had an issue. After trying to access the drive manually in the Finder, on which I had my working Lightroom image library, I realized that something was wrong with that hard drive. In fact, after a few file copy tests, suddenly the drive spontaneously “ejected” from the computer, giving me an error. I was able to get it to mount once more and tried running “First Aid” in Apple’s Disk Utility. The program locked up with a beachball curser and did not complete the test. After a while, the drive ejected once again. At this point, I disconnected the backup drive for that glitching hard drive, since I didn’t want the backup software trying to update it and promptly ordered a replacement hard drive, deciding on an external 6TB USB 3.0 drive since they were on sale.
When the replacement drive arrived, I set up SuperDuper to copy from the backup drive over to the new hard drive. This restore operation was going to take a few hours (just over 3 TB of data to copy over) but after only an hour or so, suddenly the backup drive ejected itself with an error. Nervously I restarted the restore operation again and this time after maybe 45 minutes the backup drive ejected again. Argh! I was getting very worried that I was going to permanently lose a large number of my working Lightroom images and that I would have to do a very tedious restore from Blu-ray disc backups (more on that later).
Since the backup drive seemed fine with smaller copies (at least for the moment!), I decided to start the tedious process of manually copying over folders from the backup drive to the new one, keeping the copies small enough that they completed in 5 or 10 minutes max. Between each copy session, I gave the drive a break for a few minutes before starting the next batch of copies. I did this over the course of an entire weekend and thankfully managed to get virtually all my files copied back over to the new drive, with only 2 stitched panoramic images being corrupt and unable to successfully copy, but those I could easily recreate luckily. In the end, the many thousands of images, taking up over 3 TB of space, were pretty much intact. Whew! I was sweating bullets the entire weekend though, not sure if I was going to lose a ton of images, or at least all the edits to those images.
Of course I immediately bought another new 6TB hard drive to replaced the failing backup drive and now I can breath easy again. Both of the failed hard drives were about 5 years old and what I am now doing is labeling my new drives with an “in service” date. In the future, I think I will start replacing hard drives every three years or so for peace of mind, even if they are not acting up, to try and prevent something like that from happening again. So, let’s talk about RAID enclosures now…
RAID Enclosures 101
 My latest OWC Dual-Bay RAID Enclosure with two Seagate 4TB Iron Wolf (CMR) drives installed.
What does RAID stand for? I’m not talking about a spray-can of bug killer, rather a Redundant Array of Independent Disks. Most of my hard drives are manually mirrored, so for example I might have an external Seagate 4TB drive that is backed up to a 4TB Western Digital drive, both connected via USB 3.0 and both in separate enclosures. With a RAID setup, you have two or more drives in a single enclosure and there are a number of different ways they can usually be configured. Here are the usual configurations for 2-bay enclosures, options on my two OWC units for example…
JBOD (Just a Bunch Of Disks) – With JBOD, each disk is treated like a single drive, so a filled 2-bay enclosure would show up as two different drives to the computer, a 4-bay RAID enclosure would show up as four drives etc. There is no data redundancy here, so if one drive fails, all the data on that drive is lost, but the other drives are not affected.
Span (Concatenated disks) – With Span, the drives are added together from a capacity standpoint, so if a 2-bay enclosure has one 4TB drive and one 3TB drive, it would show up as a single 7TB to the computer. There is no data redundancy and in this case, if one of the two drives fail, all the data on that one drive will be lost, and some data on the second drive may also be lost, or may need special software to recover.
RAID Level 0 (striped drives) – Level 0 requires identical drives, the same brand, capacity and even firmware. Two 4TB drives installed will look like a single 8TB drive to the computer. Level 0 “stripes” the data across both drives and it can theoretically double the throughput of a single drive in a 2-bay enclosure, or even higher in a 4-bay or larger RAID setup. This is great when you need a performance boost, for example when you need the bandwidth for editing high-res video, but Level 0 offers no data redundancy. In fact, if one drive fails then the data on all the drives in the RAID set is lost.
RAID Level 1 (mirrored drives) – Level 1 requires identical drives, the same brand, capacity and even firmware. Two 4TB drives installed will look like a single 4TB drive to the computer. Depending on the enclosure, disk read performance may be higher than disk write performance. During use, the RAID controller will write data to both drives at the same time and if one drive fails, you can install a replacement drive and the controller will automatically rebuild the array, copying the data from the good drive to the new blank drive. In the above photo of the OWC enclosure, you can see the “Rebuild” light, which is thankfully not on! In addition, you can see two green lights, one for each installed drive. If one drive were to start glitching or fail, the corresponding light would turn red to indicate that there is a problem with the drive. For me, RAID Level 1 is what I am using in all three of my RAID enclosures, since data security is more important to me than performance.
There are many additional RAID levels that larger enclosures can be set to, ones that combines striping and mirroring, as well as RAID Level 5, which more or less uses one disk as a “parity” drive, which is more efficient than a mirrored set. For example, if you have a 5-bay RAID enclosure with each bay holding a 4TB drive (20TB in total), then using RAID 5 means you will still have 16TB of data storage, not just 10TB, and the array can withstand any single drive failure without losing any data.
Drobo RAID Enclosures
UPDATE (June 2023): It is a shame, but you may as well ignore the following section about Drobo. Since the beginning of this year, the company is bankrupt and no longer producing, selling, updating or directly supporting their products. At this point, even if you could find a Drobo unit in stock anywhere (doubtful), I would strongly suggest avoiding it and looking to another brand of RAID enclosure, like OWC for example.
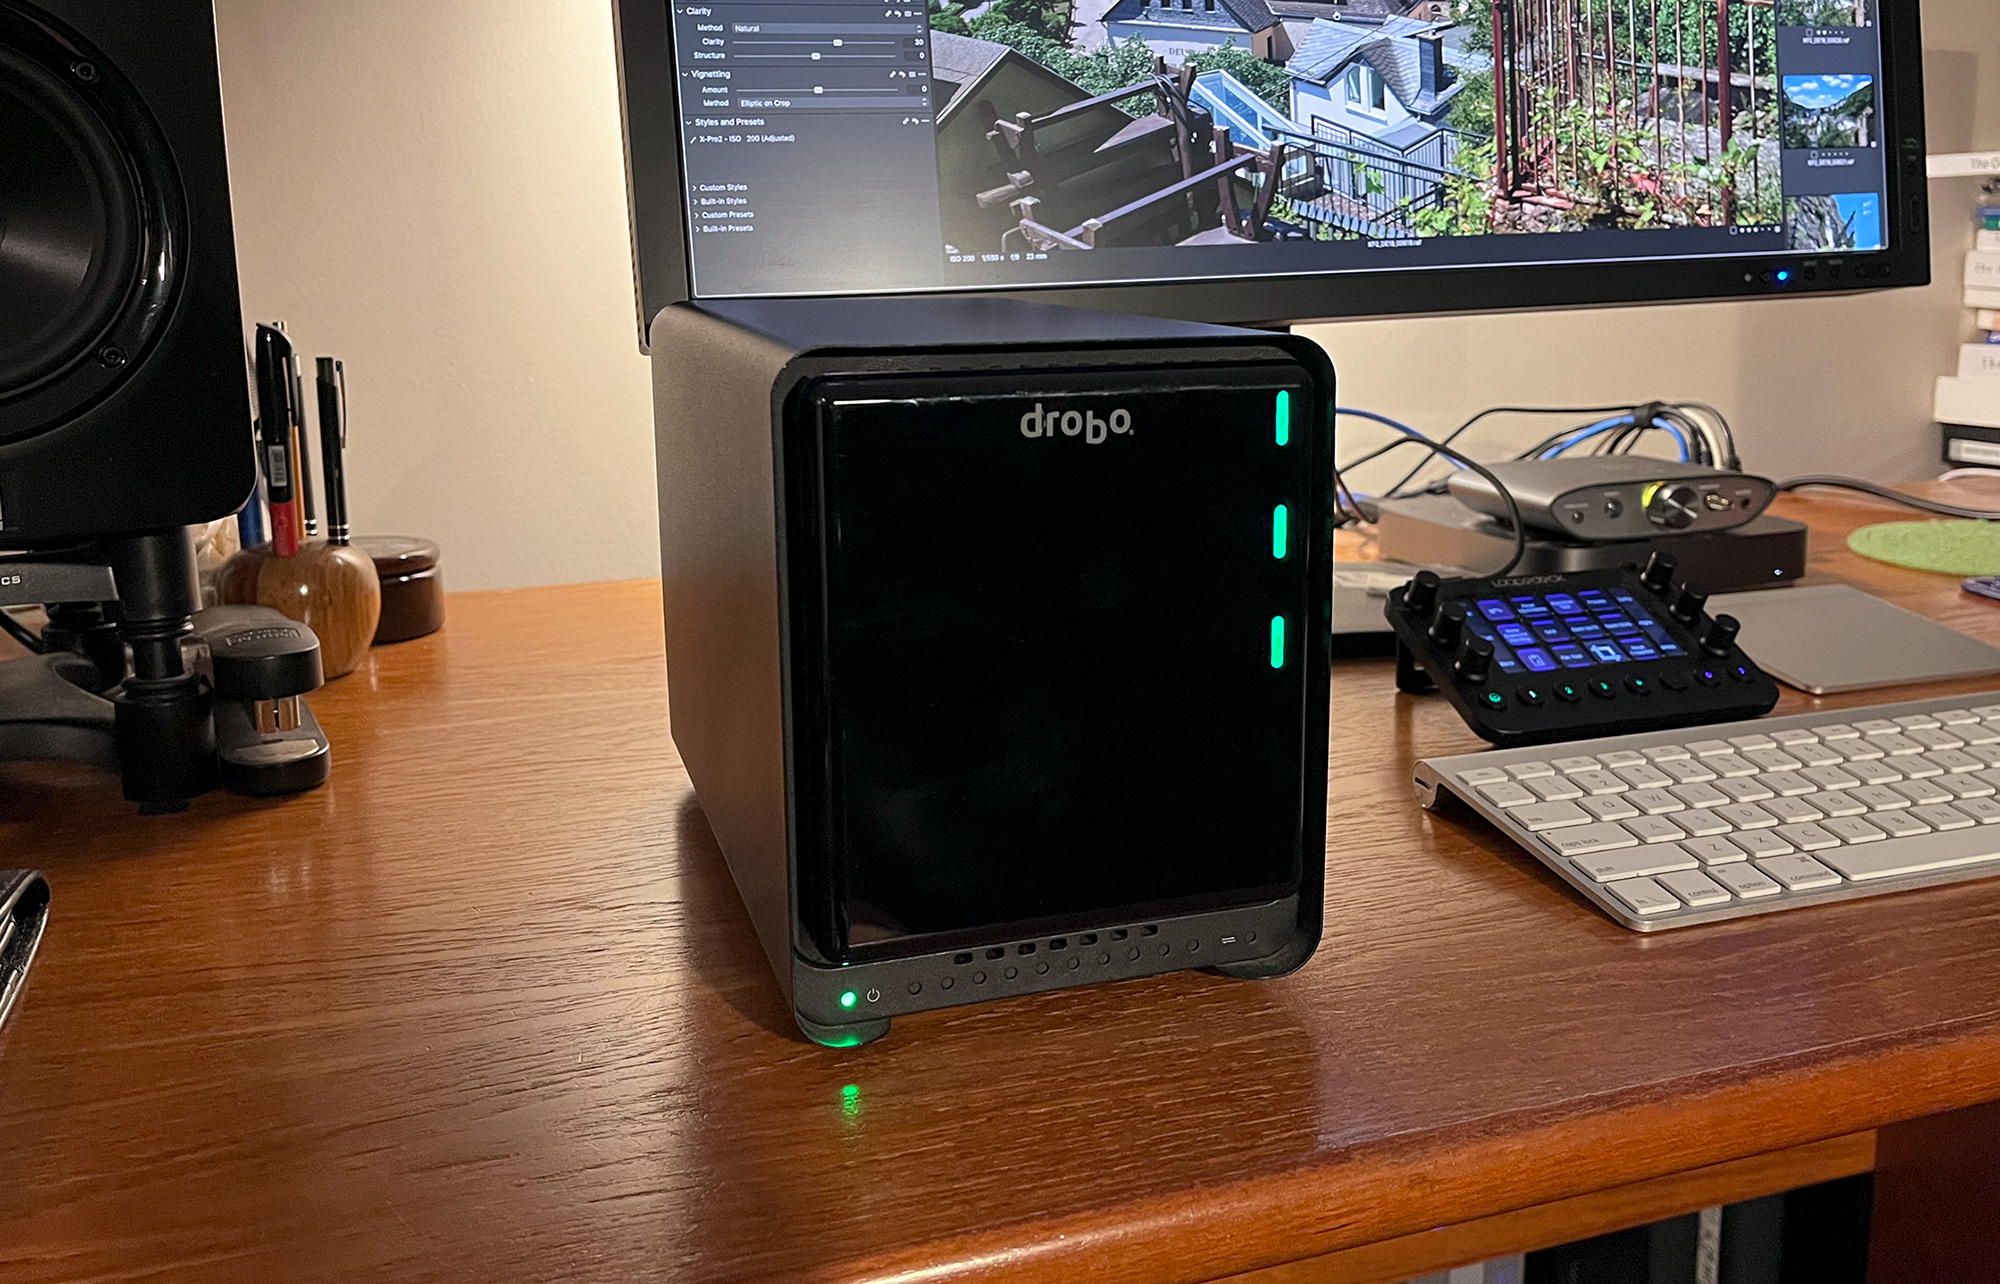
I am going to briefly mention Drobo RAID units, which use a system that’s similar, but not identical, to a normal RAID Level 5 enclosure. A photo of a 5-bay model (an old Drobo S Gen.2) is at the header of this blog posting, one I was testing out and which has three of its five bays filled (hence the three green lights). These are extremely flexible in their operation from the standpoint of upgrades and mixing and matching drives. Let’s say you have a normal 4-bay RAID setup, filled with 2TB drives. Your RAID system is getting full and you’d like to upgrade those 2TB drives to new 8TB drives. The only way to do that in a conventional RAID system is to copy all the data off the RAID setup, remove all the old 2TB drives and then replace them with 8TB drives, all at the same time. Once the new RAID is initialized, you then need to copy all the data back onto it again. This means you need to have another drive, or RAID setup, with enough free space to copy everything off that RAID enclosure you are upgrading!
The beauty of a Drobo is that in our example, you can simply eject one of the 2TB drives, replace it with an 8TB drive, wait for that drive to be fully incorporated into the RAID set and have the controller copy the relevant data over. Once you get a green light on the new 8TB drive, then go and remove a second 2TB drive, replace it with an 8TB drive, wait for the green light, then do the next one, and so on. There is no need to get all the data off the Drobo since you can just rebuild it on the fly, one drive at a time. A Drobo does not need to have all the drives be identical either, so you can mix and match drives from different brands, different speeds, different capacities. There are certainly more pros, as wells some cons, to a Drobo setup, which are beyond the scope of this posting to discuss, but if you’d like to know more, you are welcome to contact me (Mike) at Beau Photo. We can sell you a Drobo unit, and they have been popular with pro photographers, but since the pandemic, their manufacturing backlog has been huge and it sometimes takes many months for a special order to come in.
What is Dual Disk Redundancy?
Newer Drobo units, and other larger RAID setups, have dual disk redundancy capability built in, designated as RAID Level 6. You can designate that the RAID setup writes its data in such a way that you can have two drives fail the same time, and not lose any data. When you think back on my story of one drive failing, then having the backup drive start failing before all the data was copied back over to a new drive, well you can see how a dual-drive redundant RAID array could be a life saver! With RAID levels 5 and 6, there is potentially a performance penalty for write operations (worse for level 6) since the RAID controller needs to calculate parity data on the fly. Not all RAID enclosures are created equal and some might be substantially faster than others when using RAID levels that require a lot of calculations be done on the fly by the controller.
Finally, let me discuss one potential downfall of having multiple drives in one RAID drive enclosure: what if the enclosure’s power supply glitches, or its controller fails, and that corrupts or kills all of the installed hard drives at the same time? Well… your data might then all be lost in one fell swoop! In a way, having every drive in its own enclosure, and then using a system to manually mirror the drives, may be even more reliable than a RAID enclosure. Thankfully, I have never had that happen to me, nor have I heard of it happening to any people I know either, but there is that possibility. Of course, if someone rams a power pole, or there is a lightning strike, then all your individual enclosures could also be fried at the same time if there were a sudden power surge! Always use a high quality surge protector or UPS! Of course, then your house could also burn down and you’ll lose everything as well… aaaaaahhhhhhh!
Are you depressed yet!? Yes, data security, making sure all of your photos remain intact long term, can be nerve wracking and we should only go as far as we feel is necessary to protect our data. One can obsess and always imagine scenarios when some catastrophe will wipe out all of our photos, no matter how careful we are. For me, I am willing to trust those OWC 2-bay RAID enclosures since they come from a reputable company that has been around for a long time. For me, a combination of 2-bay mirrored RAID enclosures, as well as nightly mirrored independent drives, is where I am at for data security. I may decide to also implement a large (8 – 12 TB) external drive and actually mirror my RAID enclosure data onto it as well, since that would then effectively act as a dual-disk redundant drive for those RAID boxes, but I am not sure if I will go that extreme just yet.
Hard Drives – CMR versus SMR tech
Lastly, with respect to hard drives you may buy, I want to mention the differences between traditional CMR (Conventional Magnetic Recording), also known as called PMR (Perpendicular Magnetic Recording), versus the newer SMR (Shingled Magnetic Recording) recording technology. For the longest time, hard drives used CMR (or PMR) technology to write the tracks of data on their platters. These narrow tracks of data were written side by side, with no overlap, so data anywhere on the disk could be written to as easily as it could be read from. However in the bid to create larger and larger capacity drives, but at lower and lower pricing, manufactures found a way to slightly overlap the recorded data tracks, just like shingles on a roof overlap, allowing much higher data density on drives, requiring fewer platters as well. While reading data from an SMR drive is just as fast as a CMR drive, writing data to an SMR drive can potentially be a lot slower, especially as the drive starts filling up. This is due to the drive controller needing to rewrite a lot of data if even just a small amount changes on the shingled tracks. Drives will do this by rewriting and shuffling data around the physical drive platter to blank areas, but as the drive gets full, there is less space to efficiently rewrite and more shuffling occurs.
In a RAID situation, it can be catastrophic to use an SMR drive since if one drive suddenly takes longer to write data than the other drives in the array, a controller might incorrectly flag that drive as failing. SMR drives can really have bad performance as they fill too, so if at all possible, I’d suggest always buying CMR drives. Note that you can already buy server grade or NAS (Network Attached Storage) hard drives using CMR tech that are huge, up to 18 TB, but you will pay a lot more for those drives.
As an example of hard drive price differences, a basic 4TB SMR drive with a 1-year warranty might cost $85, a 4TB CMR drive from the same manufacturer meant for light duty server or RAID use, with a 3 year warranty, might be $129, but a high end 4TB drive with a big RAM cache, a fast rotational speed, a much higher rated duty cycle and a 5-year warranty, one that’s meant for heavy-duty server use, might be $250 or more. Personally, I am okay with the least expensive CMR drives, as in that $129 example, as long as the warranty is decent… meaning the manufacturer at least has some expectation of long term reliability. I also keep a spare, new and unused drive on hand, should a drive in a RAID enclosure ever fail. That way the drive is the exact same make and model, which should provide a seamless recovery, presuming the backup doesn’t also fail!
Your best bet for a reliable external drive, is to buy an empty drive enclosure and then install a good quality hard drive known to be using CMR tech. Or buy a RAID enclosure and put multiple CMR drives inside. It is near impossible to tell if a prepackaged external hard drive is SMR or CMR, but these days, I am willing to bet the vast majority of larger inexpensive external drives (2TB and above) are all SMR. Maybe for strictly backup usage as a single drive (not in a RAID) an SMR drive is okay, but not for a working drive that you are using day to day. For my day to day use, my Lightroom and Capture One image libraries, I am now using RAID enclosures with good quality CMR drives, instead of cheaper external “probably SMR” drives. To those, I have relegated older, less often accessed image libraries.
My final paranoid tip when buying multiple hard drives, is to try and buy the same drives from different vendors. That way it is more likely that not all the drives have serial numbers that are too close together. Sometimes there could be an assembly line glitch, something minor that might make a group of drives just a little less reliable than they should be. If all your drives were manufactured in the same group, then you might experience what I did, two drives that fail at nearly the same time. Even I don’t really go that far though to be honest, and have bought all the drives I need from one vendor. I hope I don’t regret that down the road sometime!
Blu-ray M-DISCs and a Disk Burning Backup Strategy
So… that was more than you probably ever wanted to know about hard drives, so what about burning Blu-ray disks… and why do I specifically use M-DISC BD-Rs (Blue-ray Disc, Recordable)? You may be familiar with buying movies on Blu-ray, a big step up in quality over old school DVD movies. A normal, single layer DVD-R can only hold 4.7 GB of data (a paltry amount of data in this day and age) whereas a regular Blu-ray Disc will hold 25 GB, so there is much more room to store a high quality encoded movie. There are also multi-layer BD-R discs with 50 GB and even 100 GB of capacity, but in terms of cost per GB, the writeable 25GB BD-R discs are still by far the least expensive. One issue with conventional BD-R discs is that they still use a relatively fragile dye-layer where data is burned to. This dye layer may not be all that long lasting and for some reason, I have been unable to really find any detailed accelerated aging tests done on conventional Blu-ray media, although writeable DVD and CD media have been throughly tested. The theoretical longevity of regular DVD-R media can range from a few years to upwards of 100 years or so, according to tests, but there seems no data for the much higher density regular BD-R writeable media, and the higher density and required accuracy of reading that data back is what worries me. A few years ago, I decided to spend the extra money and start buying M-DISC BD-R discs since I would rather my backed up photos last a long time, than have them start failing after five or ten years! Who knows, maybe regular Blu-ray Discs would also last long enough, but I don’t want to take the chance.
So, what exactly are M-DISCs anyway? M-DISC stands for “Millennial Disc” since in theory, these discs could last for a millennium, a thousand years. The writeable substrate is far more durable, resisting aging, heat and humidity damage, far more than what is used in regular optical discs. It also requires a much higher power laser in the disc writer, so you do you need a special Blu-Ray burner that is designed to write to M-DISCs. These days, an external M-DISC capable burner is not that expensive, under $250 I believe. Here is the link for more info about M-DISCs in general: http://www.mdisc.com
So… how do I use the Blu-ray M-DISCs? Well first and foremost, I burn my Lightroom download backups to BD-R. In my earlier article about my photo download and backup strategy, I mentioned how I had all my images on four hard drives. My main working drive and its backup, which in the case of my desktop system is a 2-bay mirrored RAID, as well as a download backup disc and its backup. What I do with the the Lightroom download backup images is write them all the BD-R, after which I delete the download backup. At this point, I have my raw downloads on BD-R and my working files on two hard drives still. Eventually, with really old Lightroom or Capture One working files, I will also write those to Blu-ray and then move the working files to a large, non backed up drive. At this point I have all my images on two BD-R discs, and one hard drive for easy access.
Being only 25GB, does mean that backing everything up can be a touch inconvenient. It is so much easier to copy a huge folder of images over to a large hard drive! Since the M-DISC BD-Rs are not cheap (a spindle of 25x Verbatim M-DISC BDRs -25GB each- costs about $90), I try to fill them as much as possible. Lightroom downloads its image backups into daily folders and I try not to break those apart if possible, but sometimes I will make (a) and (b) folders and split the day’s files in order to better fill a BD-R to max capacity.
That is basically it. I leave the burned BD-R discs in a spindle and label each one. For example, for my Lightroom download backups, the discs are labeled “LR Download BU #123” (as an example), then the size and type of disc “25GB M-DISC” (since the discs I buy are blank white and unbranded, so I can’t really tell what they are), as well as the date it was burned. Then on the spindle’s plastic case, I write down the range of discs contained and whether or not any special discs are in there, for example from a major trip or project. I use Toast Titanium software to burn the discs and after a BD-R is written, it will use a program called DiscCatalogMaker RE (included with Toast) to catalog the disc’s contents. Right now, my catalog has 454 discs, of which just over half are BD-R discs. I can do searches using the catalog software and find folders or photos, then refer to the correct spindle and extract a disc, if I ever needed to restore any photos or files.
For other images, not my “bulk” Lightroom download backups but for images I’ve retouched, stitched panoramas, print-ready images, older film scans etc., for those I will label the BD-R discs more concisely and then keep those discs in individual archival sleeves in an archival storage box. I sort these discs in the storage boxes by date and they too are cataloged in my burned disc database, making it easy to search and find files on a specific BD-R or DVD-R, and then retrieve that disc from the appropriate box.
Lastly, I also regularly replace my Blu-ray burner every few years. I am worried that an older burner might go “out of spec”, and while it might still work fine to write and read back its own discs, perhaps a new burner would have a hard time with the discs written on the old, tired one? Some years ago, one of my earlier Blu-ray burners started creating discs with a very slight uneven look to the discs, when you let light glance off the surface. Previously burned discs were totally uniform across the entire burned area. Even though those seeming unevenly burned discs could still be read, I decided to retire that burner and replace it with a new one. My discs were then perfectly uniform again. Nowadays, I look at each burned disc to see if the burn was nice and uniform, with no visible texture or uneven reflectivity. I am probably being overly paranoid there, but considering an M-DISC burner itself (not including enclosure) can be had for under $150 these days, it is fairly cheap insurance to replace the drive every few years to make sure all my burned BD-R discs are readable a long time into the future.
So there you have it. My backup strategy in great detail. Knock on wood, but so far I have basically never lost anything important, despite suffering through numerous hard drive failures over the years, and I have been working with digital images since the mid 90’s (film scans back in the day), which is over 25 years already! As mentioned, I did come close to losing a bunch of data recently when that backup drive started failing, but thankfully I managed to (just) get everything off. I will need to be more aware in the future if a hard drive starts slowing down suddenly, and I also need to watch those RAID status lights like a hawk, to make sure I catch a failing drive quickly, replace it and let the RAID rebuild itself.
As always, if you have any questions about anything in one of these tech tips articles, feel free to send me an email. Cheers!

